Beginning
Deploy in your own environment.
If you want to deploy this fortigate ansible playground using your own terminal server deploy the following docker-compose.yaml docker file.
Requirements
- Docker installed
Option 1 Download docker-compose file
Download the following docker-file
wget https://raw.githubusercontent.com/maniak-academy/aws-lab-getting-started-with-Ansible-Fortigate/main/docker-compose.yaml
Option 2 Create a docker compose file
Create a file called docker-compose.yaml in your directory
  version: '3.8'

services:

  terminal-server:
    image: sebbycorp/terminal-server:latest
    ports:
      - "7681:7681"
    environment:
      - TINI_KILL_PROCESS_GROUP=1
    # volumes:
    #   - /your/local/workspace:/workspace
    entrypoint: ["/sbin/tini", "--"]
    command: ["ttyd", "-s", "3", "-t", "titleFixed=/bin/sh", "-t", "rendererType=webgl", "-t", "disableLeaveAlert=true", "/bin/sh", "-i", "-l"]
Step 2 Execute the docker file
docker-compose up -d
…
Overview
Managing Foritgate With Ansible in AWS - A Comprehensive Introduction
Welcome to our exciting course on building a Foritgate Ansible Lab in Amazon Web Services (AWS)! In this comprehensive introduction, we will explore the intricacies of using Ansible with Fortinet, an industry-leading cybersecurity solution, and how it can be seamlessly integrated into the AWS cloud environment using Ansible.
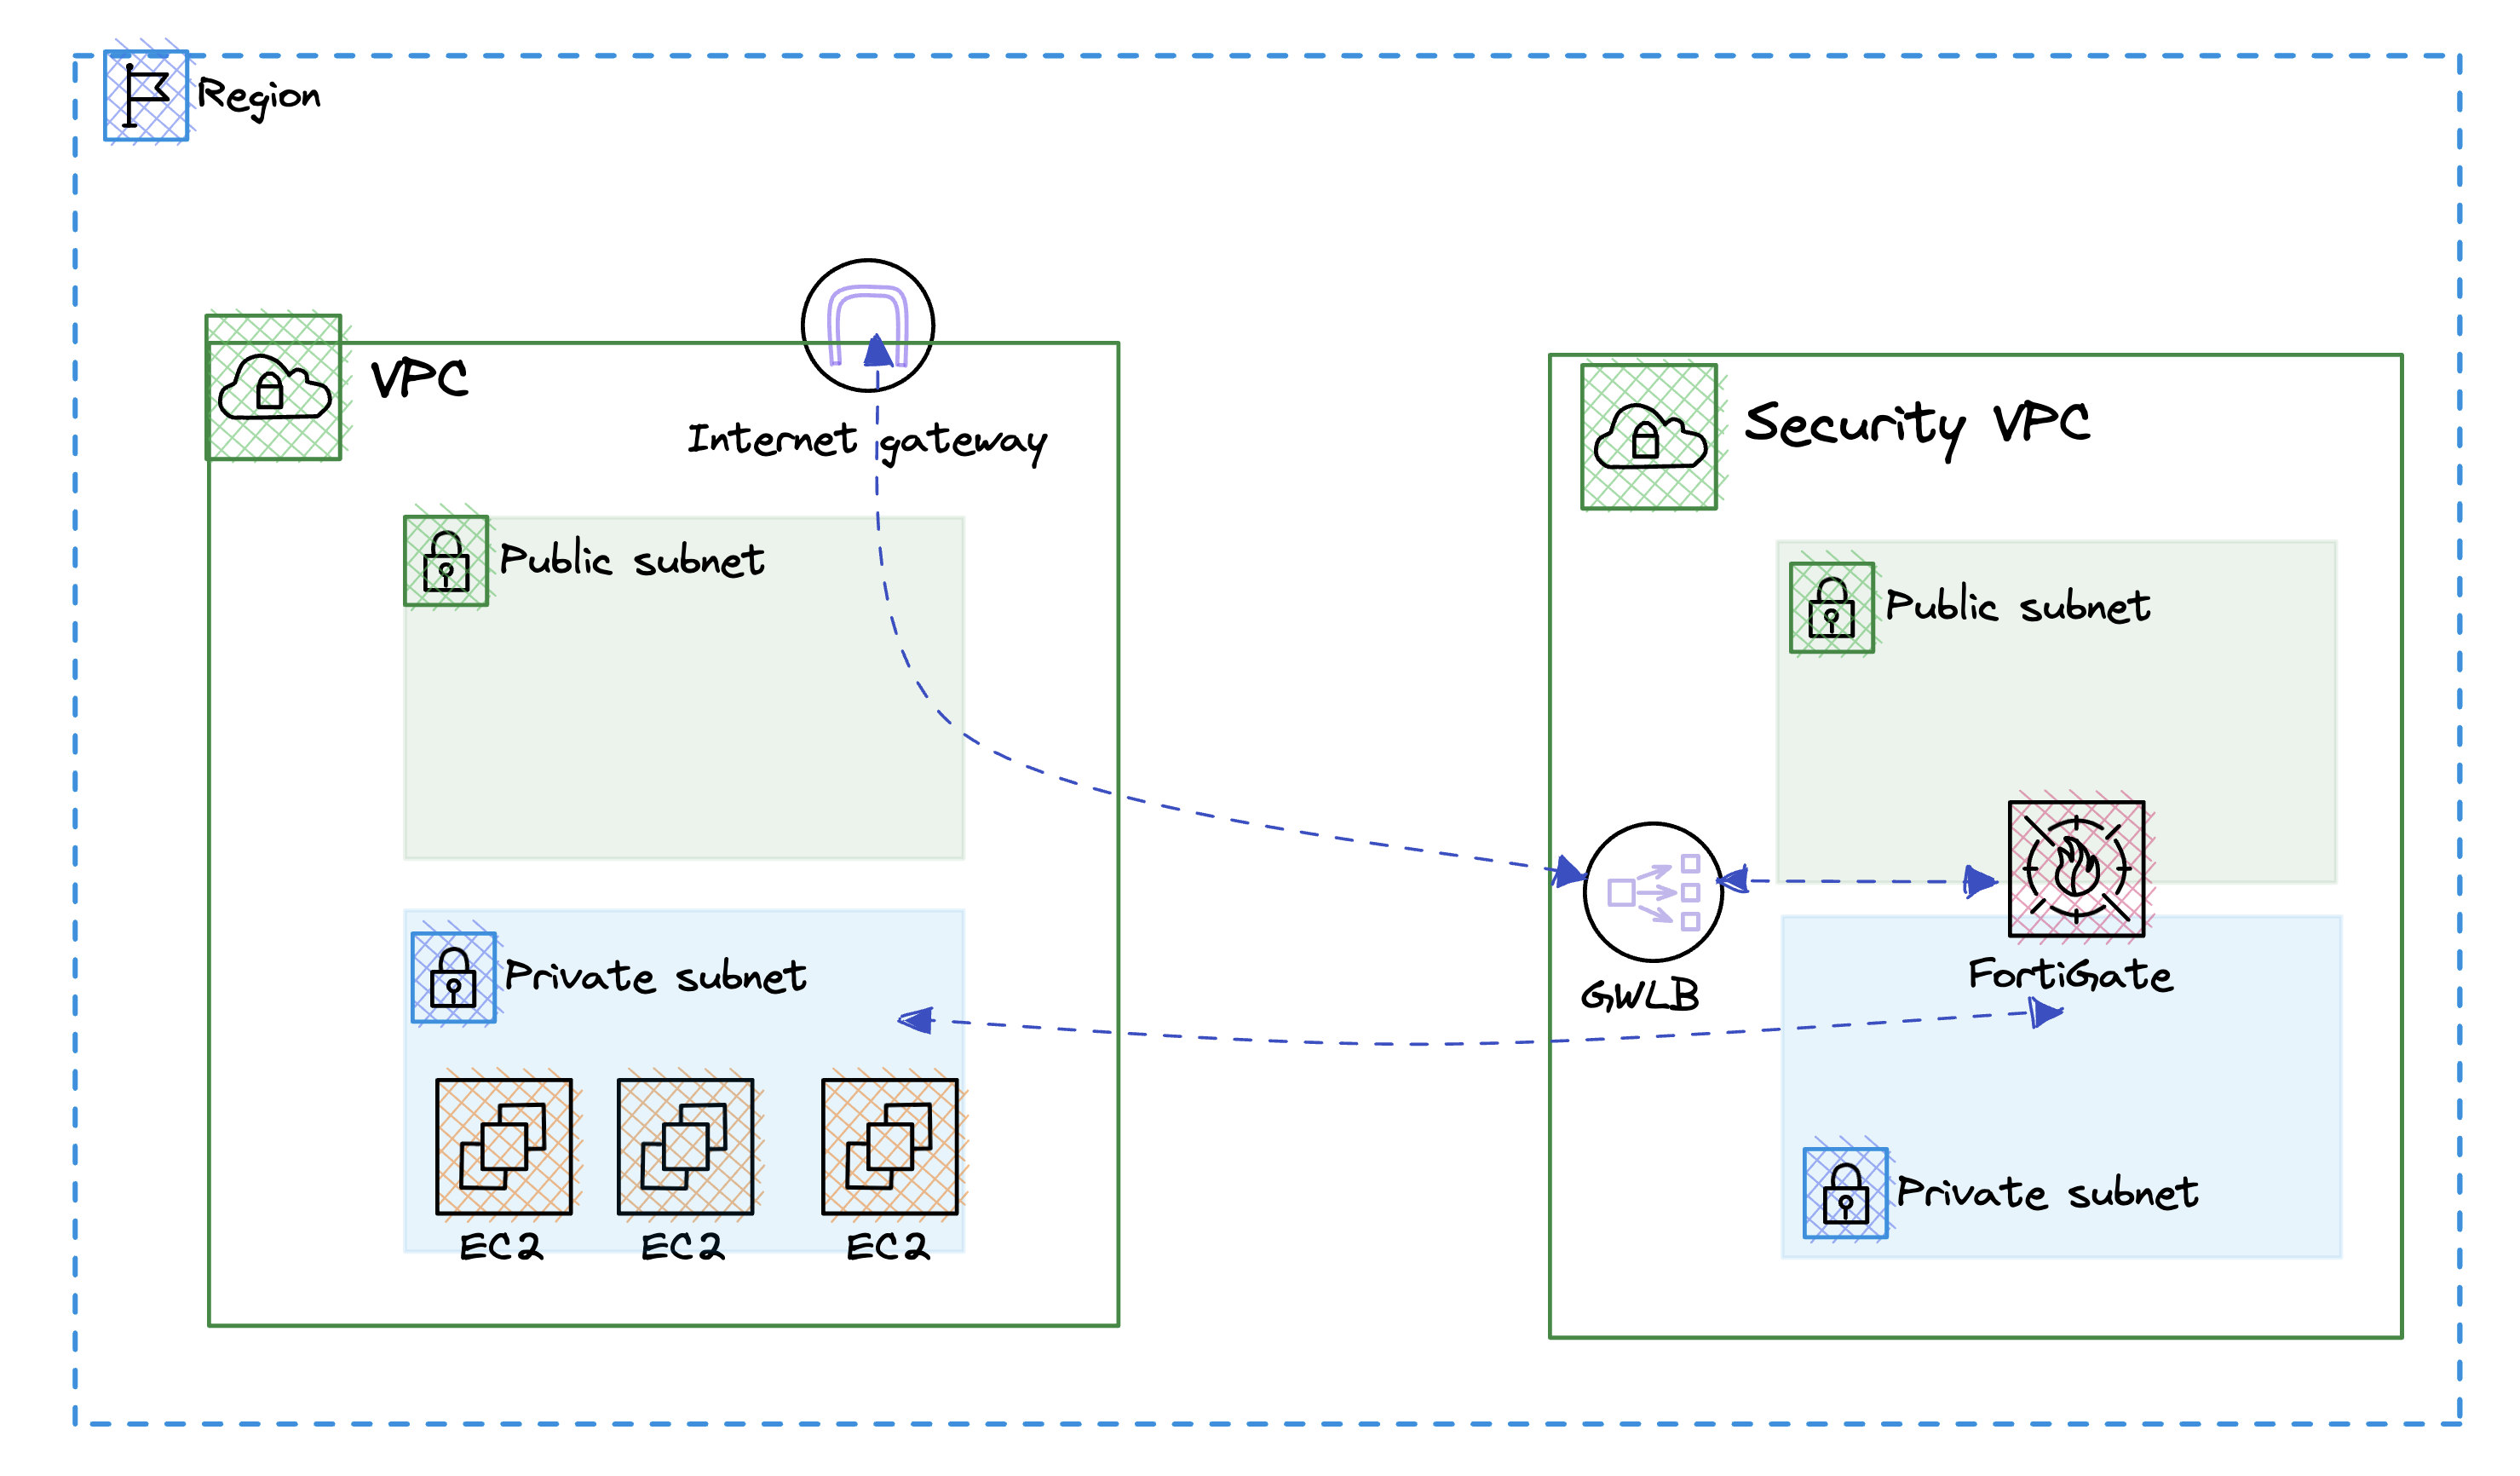
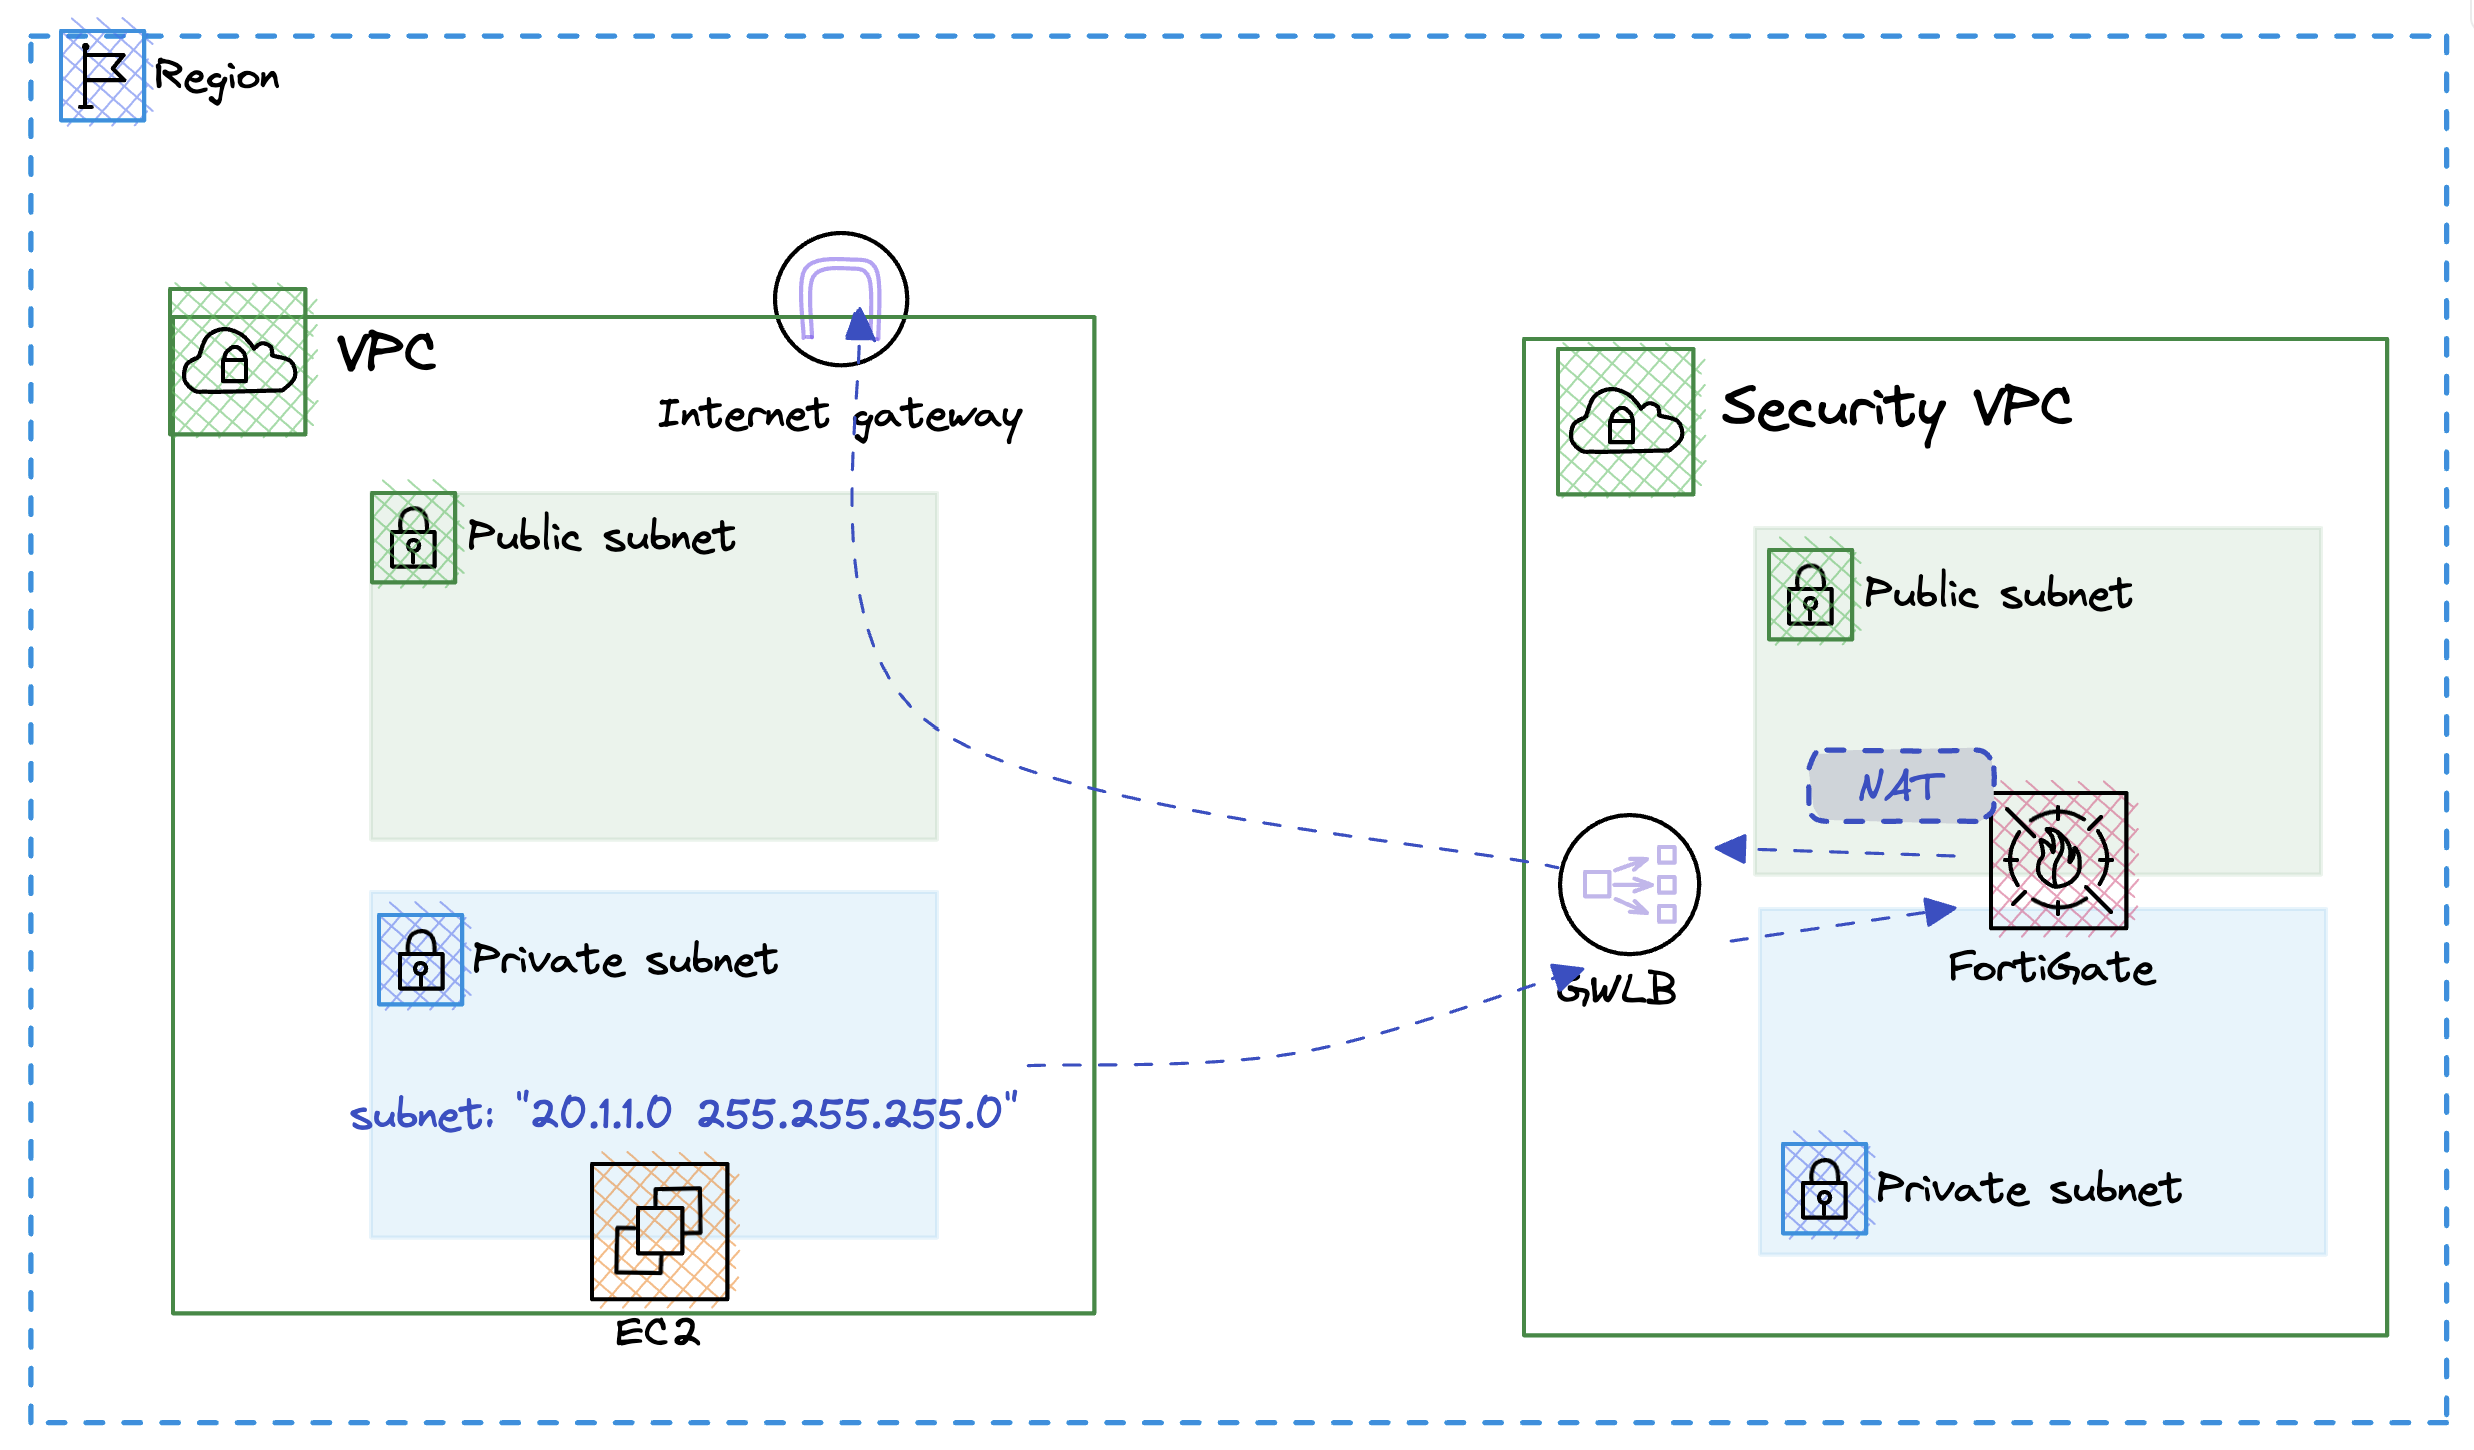
Throughout this course, you will deploy a secure VPC with GWLBN that will route all traffic throught the fortigate firewall in the central VPC.
Why Automate with Ansible and Fortinet
Customers are increasingly compelled to minimize their IT expenditures, augment their operational capacity, and achieve greater results with limited resources. Integrating the capabilities of Ansible with the robust security solutions of Fortinet, and further enhanced by the added benefits of Arrow, can significantly diminish or even eradicate operational delays. This synergy ensures compliance with organizational standards and the adoption of recognized best practices, enabling a more efficient and streamlined IT operation.
Ansible
Ansible is an open-source, cross-platform tool for resource provisioning automation that DevOps professionals use for continuous delivery of software code by taking advantage of an “infrastructure as code” approach. It’s like a digital butler for your computer systems, making sure everything is set up and running smoothly. It’s like a digital butler for your computer systems, making sure everything is set up and running smoothly.
With Ansible, you can automate tasks such as server configuration, application deployment, and infrastructure provisioning. It’s like having a personal assistant for your IT needs.
In the context of Fortinet and AWS, Ansible can be used to automate the deployment and management of Fortinet’s security solutions within an AWS environment. This can help streamline the process of setting up and maintaining a secure infrastructure, making it easier to keep your digital fortress in tip-top shape.
Arrow Gets Red hat
Arrow can help you centralize and control your Ansible infrastructure with a visual dashboard, role-based access control, job scheduling, and graphical inventory management. A REST API and CLI make it easy to embed Ansible Automation Controller into existing tools and processes. Red Hat Ansible Automation Platform is the foundation for building and operating automation services at scale, providing enterprises a composable, collaborative, and trusted execution environment. It meets customers where they are in their automation journey, bringing them a flexible automation platform to facilitate success from multiple points in their IT infrastructure. Ansible’s simple, easy-to-read automation language has made it easy for teams across an organization to share, vet, and manage automation content.
Our Approach
At the intersection of innovation and practical application, Arrow offers unique, hands-on immersion labs centered around Ansible. Instead of traditional training, these four-hour, cost-effective sessions present real-world use cases across various technology domains. By simulating actual Day1 - Day2 operations on the platform, we aim to inspire and engage your internal engineers, helping them envision and understand the potential applications of the technology. This interactive experience serves as a catalyst for technology adoption, highlighting Ansible’s capabilities and empowering your team to leverage it effectively within your unique organizational context.
…
Deploy Fortinet AWS Environment
The first step is to configure your AWS KEY and Secret so that we can build the infrastructure. Log into your AWS console and generate a key/secret-id. Execute the command below and paste your information.
aws configure
Deploy the Infrastructure the
The next step is to deploy the infrastructure, so let’s clone the repo and get into the specific folder.
  git clone https://github.com/maniak-academy/aws-lab-getting-started-with-Ansible-Fortigate.git
cd aws-lab-getting-started-with-Ansible-Fortigate
Execute your lab environment
  chmod +x deploy.sh
./deploy.sh &
…
Deploy lab
Installing Ansible on Ubuntu: A Hands-On Lab
Participants will learn how to install and configure Ansible on an Ubuntu server, gaining a fundamental understanding of Ansible installation and basic configurations.
Required Materials
- Access to an Ubuntu server (physical or virtual)
- Internet connectivity for the Ubuntu server
- Terminal access (SSH access if using a remote server)
Tutorial Outline
Step 1: Introduction to the Lab
- Brief overview of Ansible and its uses.
- Explanation of the lab setup and objectives.
Step 2: Preparing the Ubuntu Server
Ensure the server is updated:
sudo apt update && sudo apt upgrade -y
Install software-properties-common if not already installed:
sudo apt install software-properties-common
Step 3: Installing Ansible
Add Ansible’s official PPA (Personal Package Archive) to the system:
sudo add-apt-repository --yes --update ppa:ansible/ansible
Install Ansible:
sudo apt install ansible -y
Verify the installation:
ansible --version
Install FortiOS Galaxy Collection The FortiOS Ansible Galaxy supports multilple FortiOS major releases, you can install the latest collection by default via command
ansible-galaxy collection install fortinet.fortios
Step 4: Basic Configuration of Ansible
Create a simple inventory file. Explain the concept of inventory in Ansible:
echo 'localhost ansible_connection=local' > ~/ansible_hosts
Set the environment variable for the inventory file
export ANSIBLE_INVENTORY=~/ansible_hosts
Test Ansible setup with a ping module:
ansible all -m ping
Step 5: Hands-On Exercise [bonus]
Instruct participants to write a basic playbook to automate a simple task on their server (e.g., creating a directory). Guide them through running the playbook.
Ceate a new file named create_directory.yml. This can be done using a text editor or directly in the terminal:
vi create_directory.yml
Step 1. Write the Playbook: Instruct them to write the following content into the create_directory.yml file:
  ---
- name: Create a directory using Ansible
  hosts: localhost
  become: yes
  tasks:
    - name: Ensure the directory exists
      ansible.builtin.file:
        path: "/path/to/your/directory"
        state: directory
        mode: '0755'
Explain the components:
— signifies the start of YAML. name: A human-readable description of the playbook. hosts: Defines on which hosts to run the tasks. Here, it’s set to localhost. become: yes: Ensures that tasks are run with elevated privileges (sudo). tasks: The list of tasks to be executed. The task uses the ansible.builtin.file module to ensure a directory exists at the specified path.
Steo 2. Run the Playbook: Guide them to run the playbook with the following command:
ansible-playbook create_directory.yml
Verify the Directory Creation: Instruct them to check if the directory was created successfully on their server:
ls -l /path/to/your/directory
Tips Encourage participants to experiment with different directory paths and permissions. Discuss potential errors and how to troubleshoot them, like permission issues or typos in the playbook. Conclusion This exercise demonstrates a basic use of Ansible for automating simple tasks on a server. It gives participants hands-on experience with writing and running an Ansible playbook.
Remember to replace /path/to/your/directory with the actual path where they want the directory to be created. This hands-on exercise will help solidify their understanding of how Ansible playbooks are structured and executed.
…
Setup Fortigate API
Configure Fortigate API with Ansible Vault
Setup Fortigate Access token
The output of your environment will generate you all the information. Here is an exmaple of the output.
  CustomerVPC = "vpc-08a6fba32e8484bfb"
FGTPublicIP = "54.217.65.12"
FGTVPC = "vpc-0a2cb5b6a9eba2a22"
LoadBalancerPrivateIP = "10.1.1.157"
Password = "i-0433533d74b68c24b"
Username = "admin"
csprivatesubnetaz1 = "subnet-0ce4ec9c8c9076290"
csprivatesubnetaz2 = "subnet-0926575924429120e"
customer_vpc_id = "vpc-08a6fba32e8484bfb"
fwsshkey = "sshfwkey"
- Log into the fortigate devices https://54.217.65.12
- Log in with username admin passoword i-0433533d74b68c24b. [note you will need to change the password]
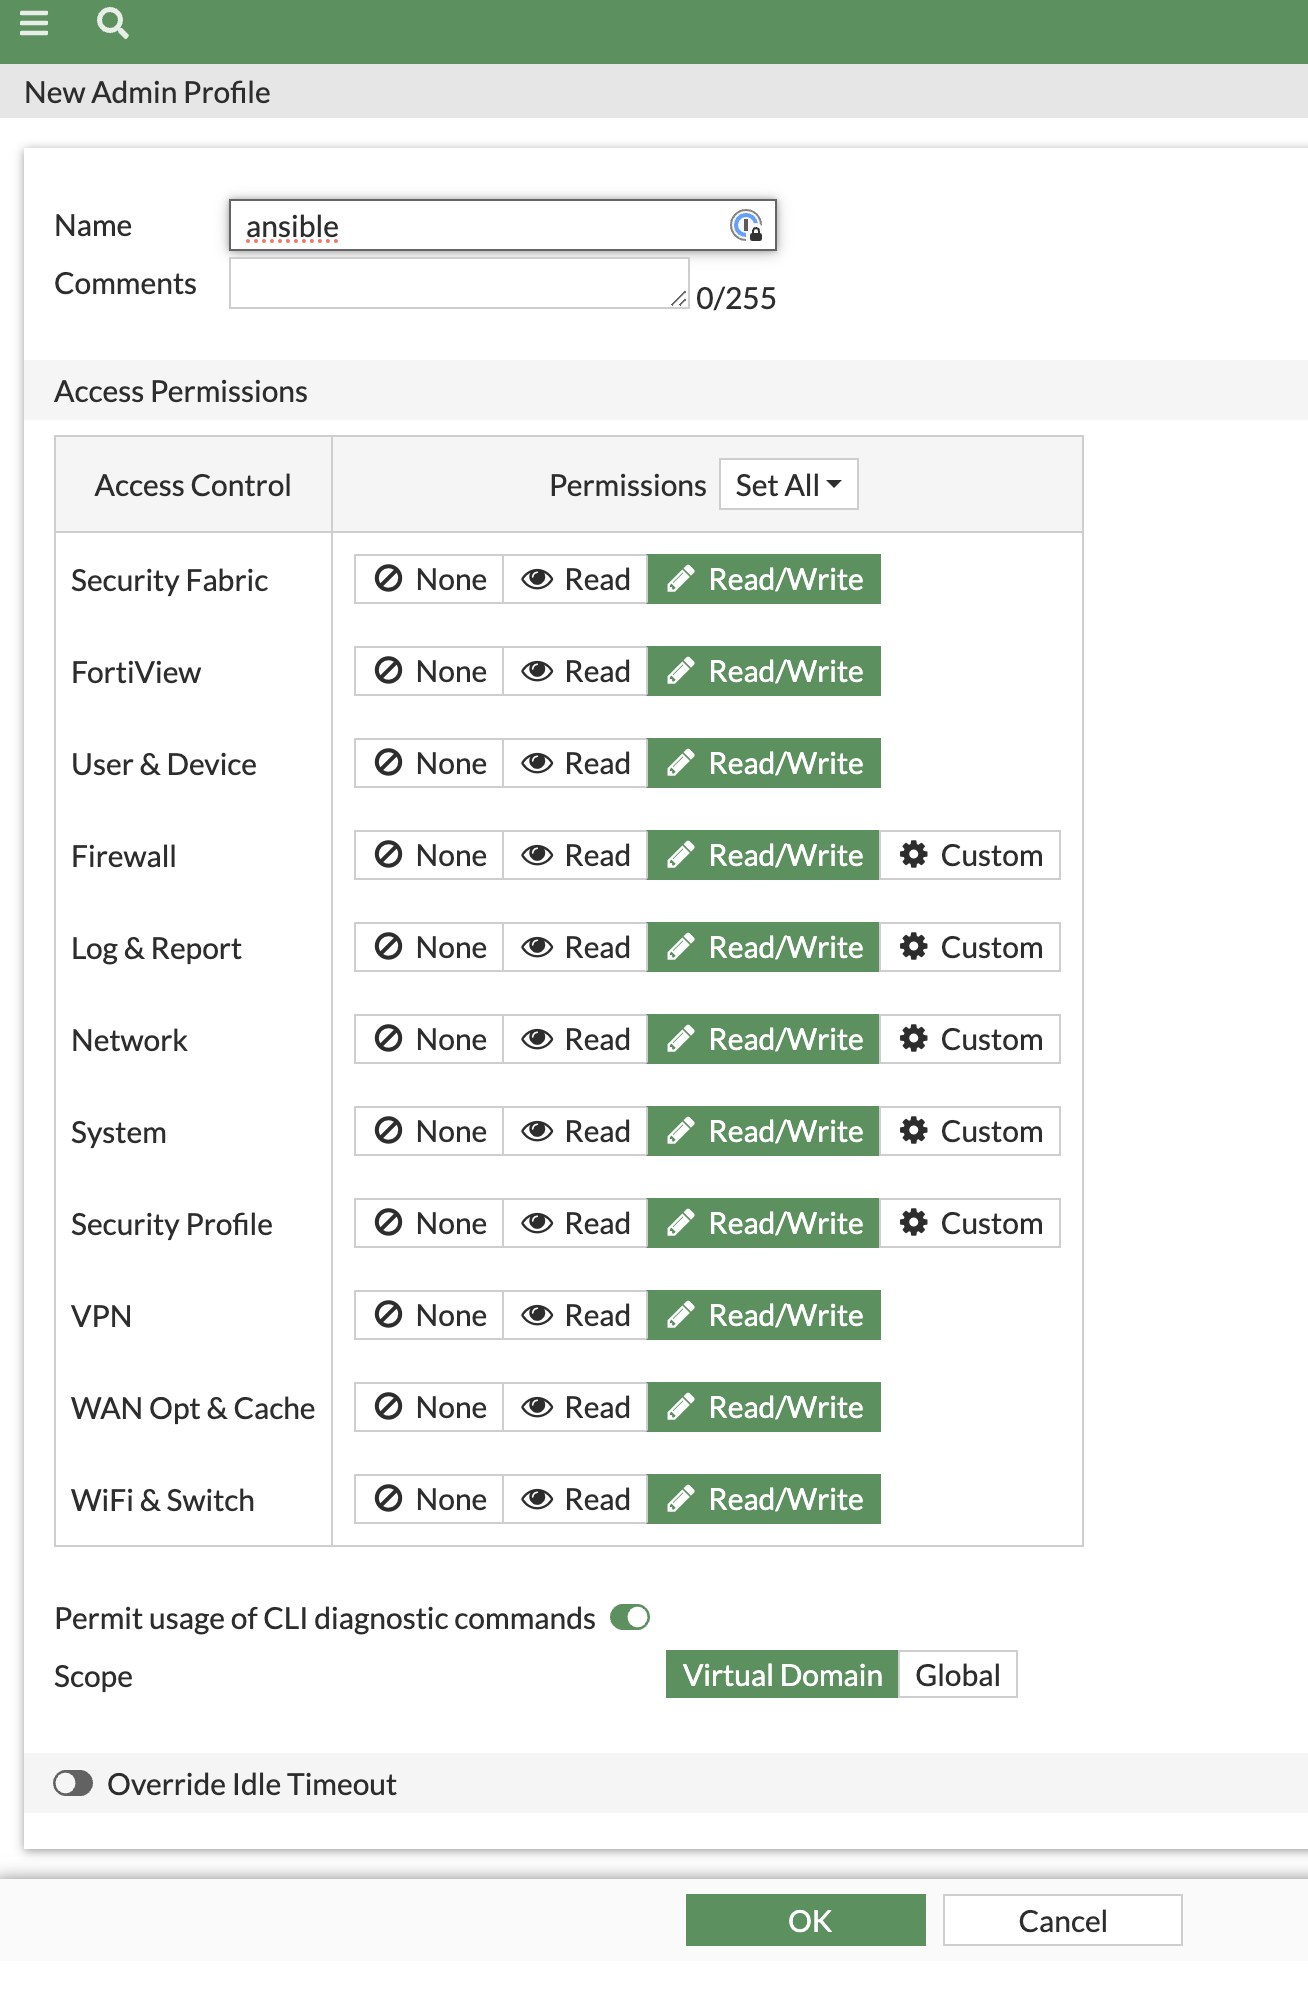
- System > Admin Profiles > Create New > Profile
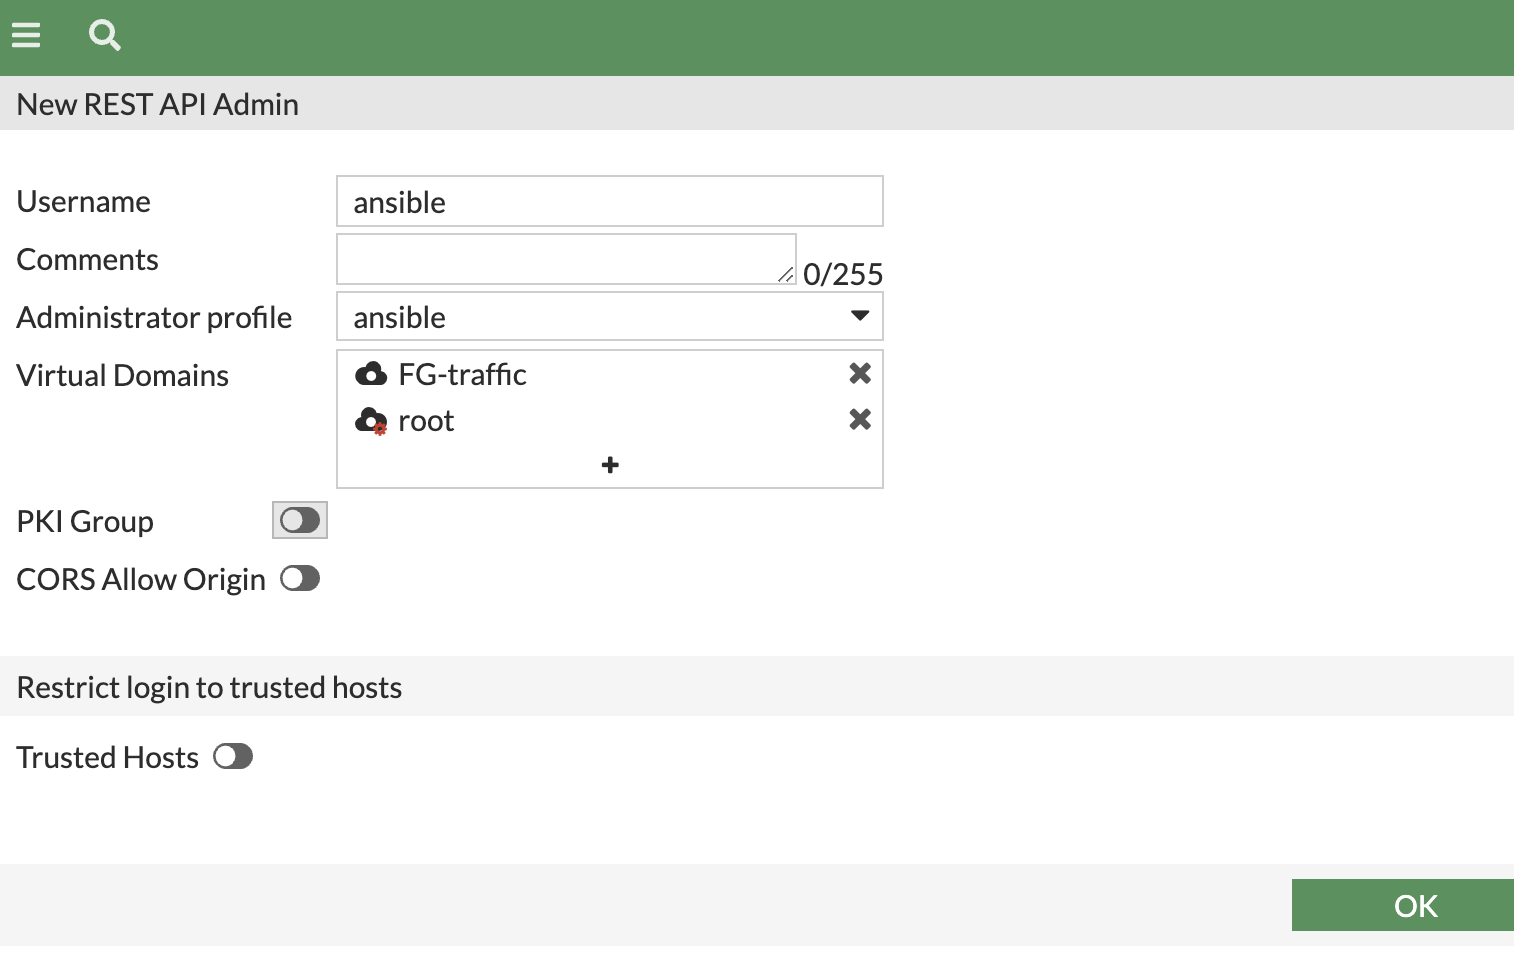
- System > Administrators > Create New rest API
Secrets… Ansible Vault
Ansible Vault is a feature of Ansible that allows you to keep sensitive data such as passwords or keys in encrypted files, rather than as plaintext in playbooks or roles. This is useful when you need to store your configuration data securely and share it across your team or systems.
Here are some key points about Ansible Vault:
Encryption: Vault can encrypt any structured data file used by Ansible. This could be the main inventory file, variable files, or role data files.
Passwords: When you encrypt a file with Ansible Vault, you must provide a password. That password will be required later to edit, view, or decrypt the encrypted data.
Files: Ansible Vault can encrypt entire files, a practice that’s useful for files containing variables or configuration that include sensitive information. It’s also possible to encrypt only certain variables within a file.
Commands:
ansible-vault create: Create a new encrypted data file. ansible-vault edit: Edit an encrypted data file. This command will decrypt the file, launch an editor, and re-encrypt the file when the editor is closed. ansible-vault view: View encrypted file contents without editing them. ansible-vault decrypt: Decrypt a file for editing or adding to source control. ansible-vault encrypt: Encrypt a previously unencrypted file. ansible-vault rekey: Change the password on an encrypted file. Running Playbooks: When you run a playbook that includes Vault-encrypted files, you need to provide the vault password. This can be done through a command-line prompt, a password file, or other methods like Ansible Tower’s built-in vault.
Best Practices: It’s recommended to use ansible-vault for sensitive variables and to keep vault files as small as possible. You should only store sensitive information in these files and use regular Ansible variables and files for non-sensitive data.
Ansible Vault is a critical tool for managing secrets within Ansible, providing a balance between security and convenience.
Create a Vault Secret token with ur API key
Let’s make sure we encrypt the token, so lets use Ansible Vault
- Create the Ansible Vault Secret Token
- First, you need to encrypt your Fortigate token (47dwqz9pw6GHy6fbmb6wwh6t8Hc686) using Ansible Vault.
Encryption:
- Run the following command in your terminal:
ansible-vault encrypt_string '5sx4G3nbHG4krwjj7w7wqQwrndr63b' --name 'fortigate_token'
- This will prompt you to create a password. Once you enter and confirm the password, it will output an encrypted string.
example.
  Encryption successful

fortigate_token: !vault |
          $ANSIBLE_VAULT;1.1;AES256
          38323665323035666633396461383536386233336461613036323834363161383863393637333162
          3737393364363030663063303730393862613434613333380a346665656432633936373266333831
          63613033633362373438633965666265323837313832666633383537363161653065396532613332
          3939386435393335300a336530343034616265613833306564663431396435653265653630313236
          39613266386438623266623462326437323765316339323665326336613535343462
Storing Encrypted Token:
Copy the encrypted string. Save it in a YAML file (e.g., secrets.yml) or directly in your Ansible playbook.
Ansible Inventory
Let’s build an inventory
An Ansible inventory is a configuration file that provides information about the machines that Ansible manages. It defines a list of nodes or hosts with their respective IP addresses, domain names, and other parameters that Ansible uses to connect to and interact with them.
Here are some key aspects of an Ansible inventory:
Hosts: Individual machines managed by Ansible. Hosts can be specified with IP addresses or hostnames. Groups: Collections of hosts that share a common attribute, which makes it easier to target them with specific playbooks. Groups can have children and can also be nested.
Host Variables: Variables specific to a host, which can override group variables for that host. Group Variables: Variables that are applied to all hosts in a group.
Prepare host inventory using the info from the output.
create a vi hosts.ini
  [fortigates]
awsfortigate ansible_host=<replace> fortios_access_token=secrets.yml

[fortigates:vars]
ansible_network_os=fortinet.fortios.fortios
vdom=FG-traffic
fortigate_token=secrets.yml
…
Ansible First Playbook
Let’s deploy your first playbook
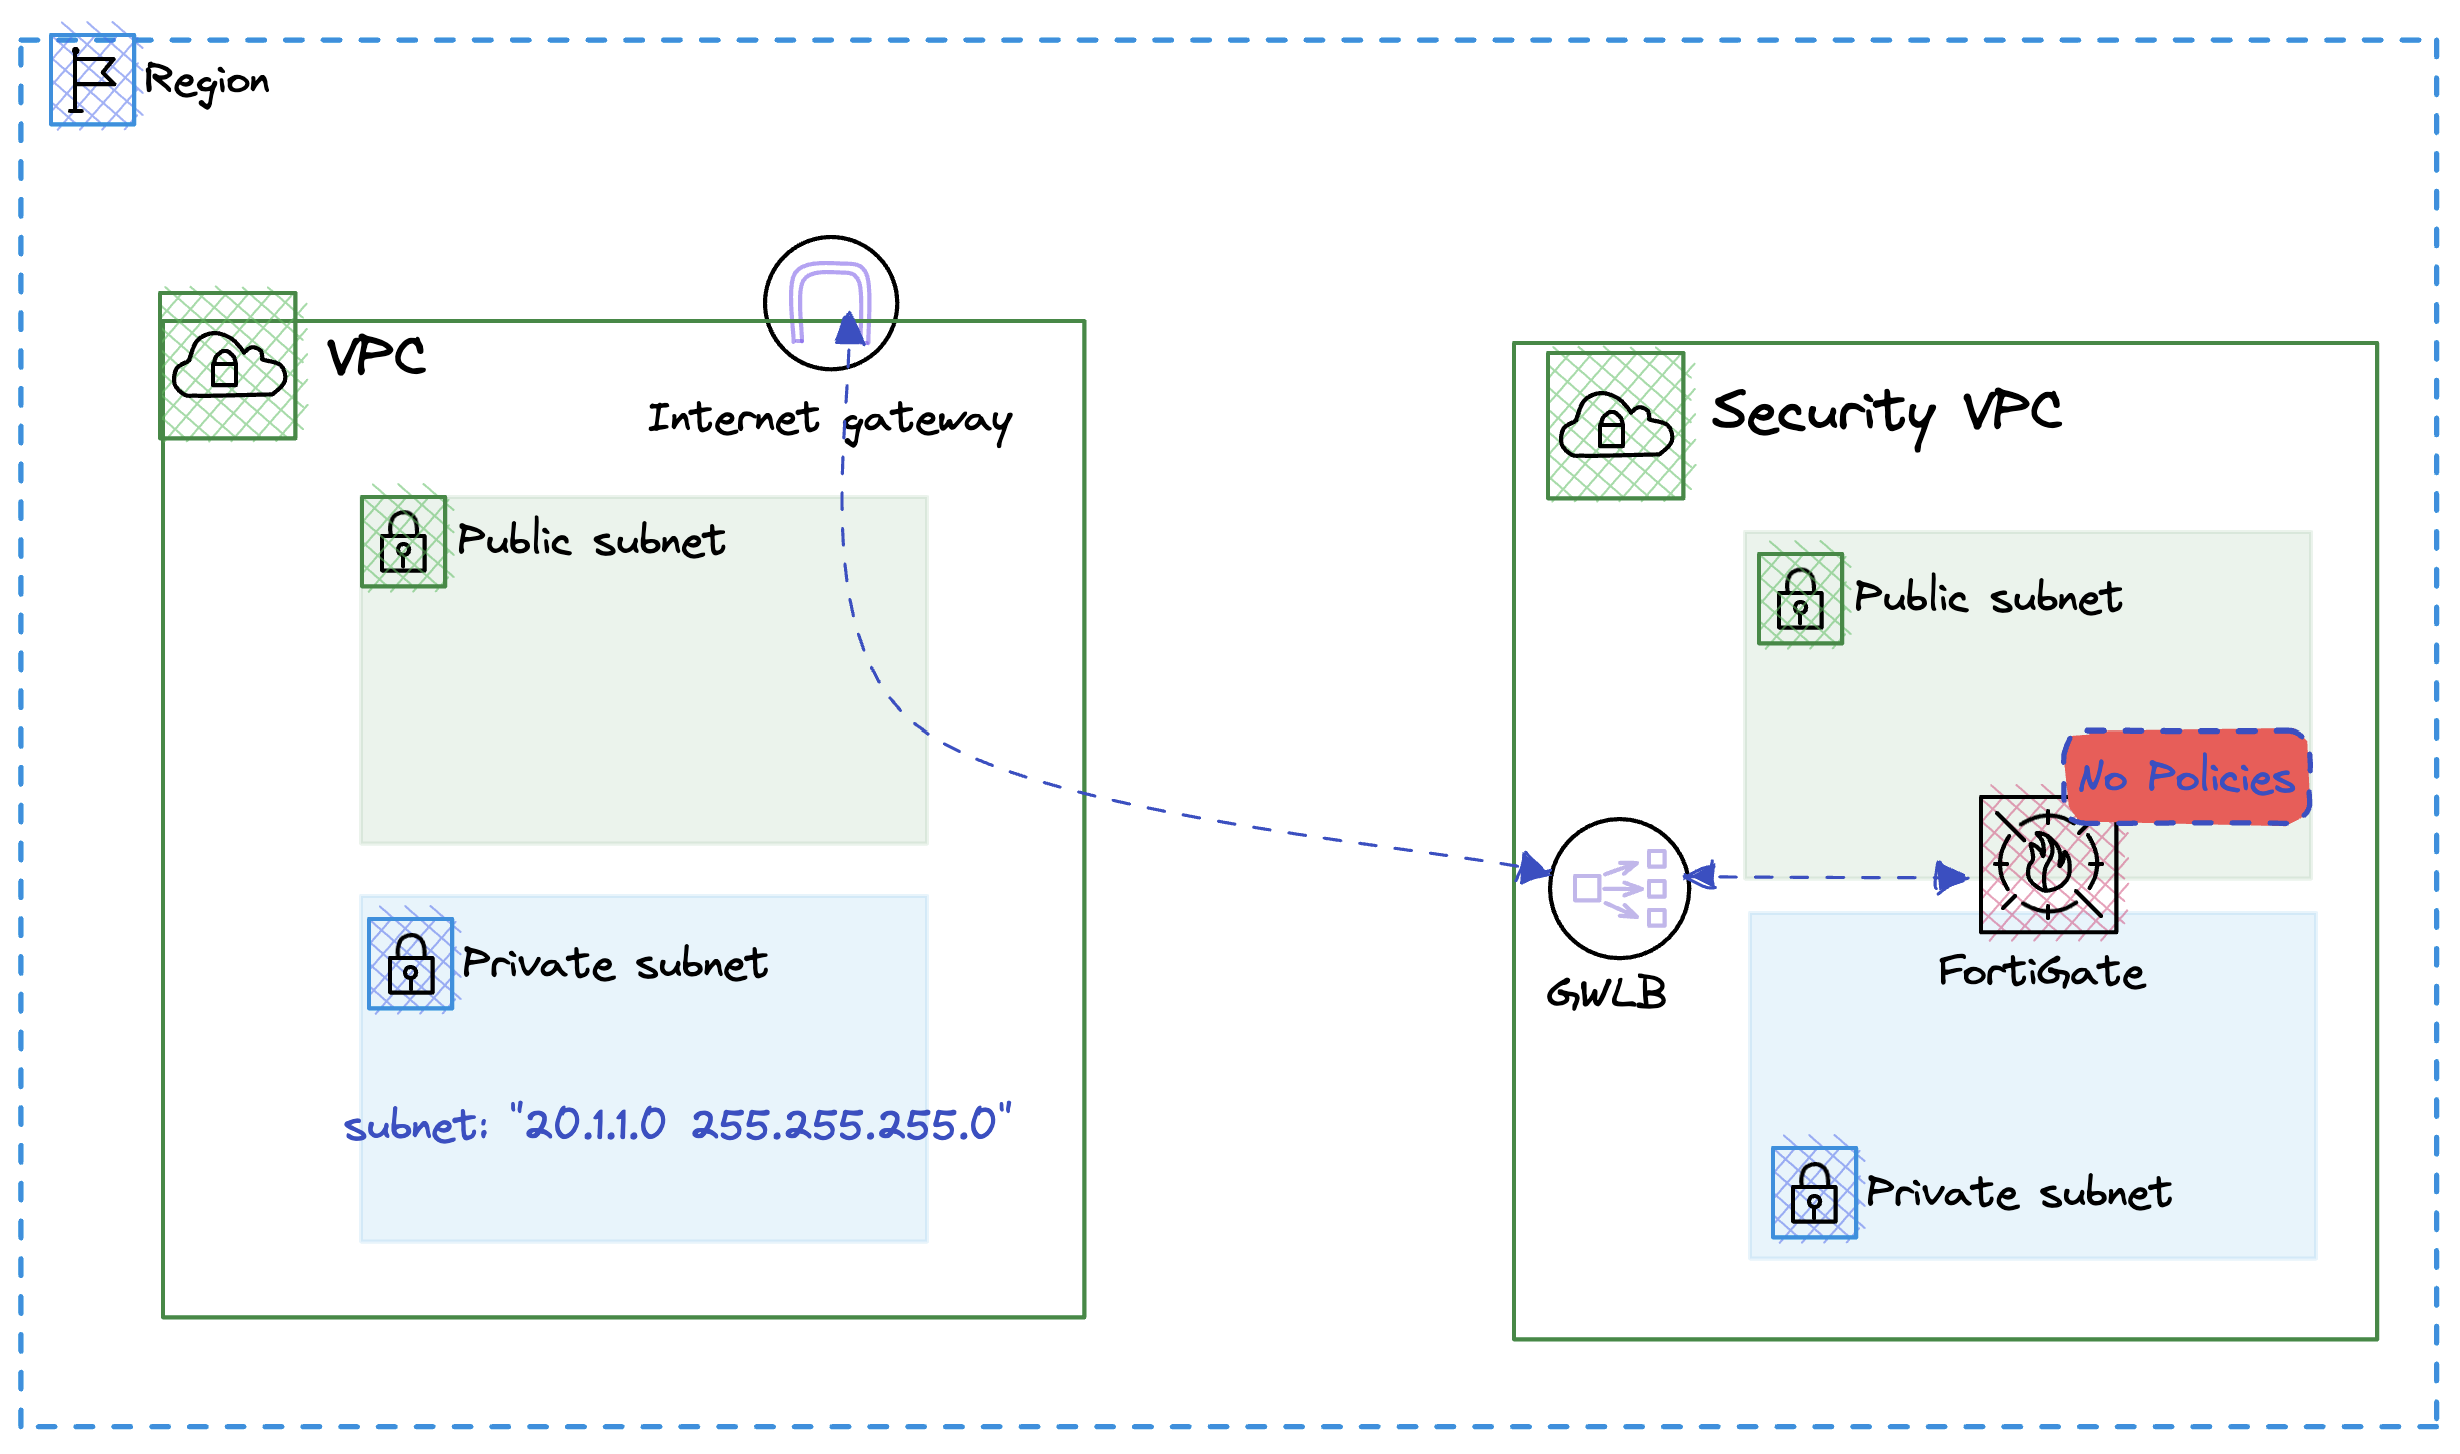
The exising environment is deploy and if you log into your foritgate you will notice there are no rules and policies built. So the first step we will need to do is to deploy a an address group that with the az1 subnet.
Step 1. Create first playbook
Create a new file called 00-playbook.yml using vi or vscode and create the following playbook.
  - hosts: fortigates
  connection: httpapi
  collections:
  - fortinet.fortios
  vars:
   ansible_httpapi_use_ssl: yes
   ansible_httpapi_validate_certs: no
   ansible_httpapi_port: 443

  vars_files:
    - secrets.yml

  tasks:
      - name: Define a AWS AZ1 Address Group
        fortios_firewall_address:
          vdom: "{{ vdom }}"
          access_token: "{{ fortigate_token }}"
          state: "present"
          firewall_address:
            name: "az1_subnet"
            subnet: "20.1.1.0 255.255.255.0"
            comment: "Created by Ansible"
The YAML snippet you’ve shared describes an Ansible playbook that is designed to configure FortiGate devices using the httpapi connection method and the fortinet.fortios collection. This playbook specifically aims to define an AWS Availability Zone 1 (AZ1) address group on a FortiGate device. Here’s a breakdown of the key components of the playbook:
Hosts: It targets hosts grouped under fortigates, indicating that the operations are intended for devices identified as FortiGate firewalls.
Connection: The playbook uses the httpapi connection type, which is suitable for devices that can be managed over HTTP or HTTPS APIs, indicating that it communicates with FortiGate devices through their HTTP-based API.
Collections: It specifies the use of the fortinet.fortios collection, a set of Ansible modules provided by Fortinet that are specifically designed to manage FortiOS devices, including FortiGate firewalls.
Vars:
ansible_httpapi_use_ssl: This variable is set to yes, indicating that the playbook should use SSL (HTTPS) for the API connection. ansible_httpapi_validate_certs: Set to no, this tells Ansible not to validate SSL certificates. This might be used in environments where self-signed or untrusted certificates are in place. ansible_httpapi_port: Specifies the port to connect to, set to 443, which is the standard port for HTTPS. Vars_files: The playbook includes a variable file named secrets.yml. This file likely contains sensitive information such as authentication tokens (fortigate_token) or other secrets required for the playbook to execute securely.
Tasks: The playbook defines a single task:
Name: “Define a AWS AZ1 Address Group” Module: fortios_firewall_address, a module from the fortinet.fortios collection used to manage firewall address objects in FortiOS. Parameters: vdom: The virtual domain on the FortiGate device to which the configuration applies, specified by a variable {{ vdom }} that would be defined elsewhere in the playbook or in the secrets.yml file. access_token: Authentication token required for API access, specified by {{ fortigate_token }}. state: Set to “present”, ensuring that the address object exists with the given configuration. firewall_address: The details of the firewall address object to be created or updated, including its name (az1_subnet), subnet (20.1.1.0 255.255.255.0), and a comment. This playbook is a straightforward example of how Ansible can automate network configuration tasks for FortiGate firewalls, leveraging Fortinet’s Ansible collections for secure and efficient management of firewall policies and objects.
Execute the playbook
Exectute the following playbook and insert your ansible-vault password
ansible-playbook -i hosts.ini 00-playbook.yml --ask-vault-pass
The ouptu will look like this, validate the addreses group was created.
  PLAY [fortigates] *******************************************************************************************

TASK [Gathering Facts] **************************************************************************************
ok: [awsfortigate]

TASK [Define a AWS AZ1 Address Group] ***********************************************************************
changed: [awsfortigate]

PLAY RECAP **************************************************************************************************
awsfortigate               : ok=2    changed=1    unreachable=0    failed=0    skipped=0    rescued=0    ignored=0
…
Ansible Outbound Access
Let’s create outbound access
Next we need to create a output policy/rule on our fortigate firewall to allow output access.

Step 1. Create Next playbook
Create a new file called 01-playbook.yml using vi or vscode and create the following playbook.
  - hosts: fortigates
  connection: httpapi
  collections:
  - fortinet.fortios
  vars:
   ansible_httpapi_use_ssl: yes
   ansible_httpapi_validate_certs: no
   ansible_httpapi_port: 443

  vars_files:
    - secrets.yml

  tasks:
      - name: Create Firewall Policy for Outbound Traffic
        fortios_firewall_policy:
          vdom: "{{ vdom }}"
          access_token: "{{ fortigate_token }}"
          state: "present"
          firewall_policy:
            policyid: 1  # Adjust policy ID as needed
            name: "oubtound_traffic"
            srcintf:
              - name: "awsgeneve"  # Specify the source interface
            dstintf:
              - name: "awsgeneve"  # Specify the destination interface
            srcaddr:
              - name: "az1_subnet"
            dstaddr:
              - name: "all"
            service:
              - name: "ALL"
            action: "accept"
            schedule: "always"
            logtraffic: "all"
This Ansible playbook is designed to automate the configuration of firewall policies on FortiGate devices using the httpapi connection. It specifically creates a firewall policy for managing outbound traffic through a FortiGate firewall. Here’s a detailed breakdown of its components:
Hosts: The playbook targets the fortigates group, indicating it is intended to run on devices classified under this group in the Ansible inventory, which are presumably FortiGate firewalls.
Connection: Utilizes the httpapi connection type, suggesting that the playbook communicates with the FortiGate devices using their HTTP API, a common approach for automating tasks on network devices that support API interactions.
Collections: Employs the fortinet.fortios collection, which includes Ansible modules specifically designed for managing Fortinet’s FortiOS, the operating system running on FortiGate devices.
Vars:
ansible_httpapi_use_ssl: Set to yes to ensure the connection to the device is encrypted using SSL (HTTPS). ansible_httpapi_validate_certs: Disabled (set to no) to bypass SSL certificate validation. This is useful in environments where devices might use self-signed certificates. ansible_httpapi_port: Specifies the port for the HTTPS connection, using the standard secure port 443. Vars_files: Includes external variable definitions from secrets.yml, which likely contains sensitive information such as the vdom (virtual domain on the FortiGate to manage) and fortigate_token (the access token for API authentication).
Tasks: Defines a single task to create or ensure the presence of a specific firewall policy for outbound traffic.
Name: “Create Firewall Policy for Outbound Traffic” Module: fortios_firewall_policy, part of the fortinet.fortios collection, used here to manage firewall policies on the device. Parameters: vdom: Specifies the virtual domain within the FortiGate to which the policy will be applied, leveraging a variable that should be defined in secrets.yml. access_token: Uses a variable for authentication, expected to be defined in the external variables file. state: Set to “present”, ensuring the firewall policy exists with the specified settings. firewall_policy: Details of the policy to be applied, including: policyid: The unique identifier for the policy. This needs to be adjusted based on existing policies to avoid conflicts. name: The name of the policy, here described as “outbound_traffic”. srcintf and dstintf: Define the source and destination interfaces for the traffic, both set to “awsgeneve” in this example. srcaddr and dstaddr: Specify the source and destination addresses for the policy, targeting “az1_subnet” for source and “all” for destination addresses. service: The services covered by the policy, set to “ALL” to include all traffic. action: Defines what to do with the matched traffic, here set to “accept”. schedule: When the policy is active, set to “always” in this case. logtraffic: Determines the logging level for traffic that matches the policy, set to log all traffic. This playbook illustrates how Ansible can be used to streamline and automate the management of network security policies on FortiGate firewalls, enhancing efficiency and ensuring consistency across the network infrastructure.
Execute the playbook
Exectute the following playbook and insert your ansible-vault password
ansible-playbook -i hosts.ini 01-playbook.yml --ask-vault-pass
The ouptu will look like this, validate the policy has been deployed
PLAY [fortigates] ********************************************************************************************************************************************

TASK [Gathering Facts] ***************************************************************************************************************************************
ok: [awsfortigate]

TASK [Create Firewall Policy for Outbound Traffic] ***********************************************************************************************************
changed: [awsfortigate]

PLAY RECAP ***************************************************************************************************************************************************
awsfortigate               : ok=2    changed=1    unreachable=0    failed=0    skipped=0    rescued=0    ignored=0
…
Deploy JuiceShop App
Let’s deploy an app
With output access deployed, we can now deploy a juicebox application.
Steps to deploy application in AWS
- jump into the terraform folder and edit the main.tf file
- uncomment the following code and save the file
  # module "juiceshop" {
#   source = "./juiceshop"
#   fwsshkey           = module.infrastructure.fwsshkey
#   customer_vpc_id    = module.infrastructure.customer_vpc_id
#   csprivatesubnetaz1 = module.infrastructure.csprivatesubnetaz1
#   depends_on = [ module.infrastructure]
# }

#output "juiceshop_public_ip" {
#  value = module.juiceshop.juiceshop_public_ip
#}

#output "juiceshop_private_ip" {
#  value = module.juiceshop.juiceshop_private_ip
#}  `
- next execute the following command to deploy the application
./deploy.sh
The code will deploy an application in your environment and the output will look like the following.
  CustomerVPC = "vpc-08a6fba32e8484bfb"
FGTPublicIP = "54.217.65.12"
FGTVPC = "vpc-0a2cb5b6a9eba2a22"
LoadBalancerPrivateIP = "10.1.1.157"
Password = "i-0433533d74b68c24b"
Username = "admin"
csprivatesubnetaz1 = "subnet-0ce4ec9c8c9076290"
csprivatesubnetaz2 = "subnet-0926575924429120e"
customer_vpc_id = "vpc-08a6fba32e8484bfb"
fwsshkey = "sshfwkey"
juiceshop_private_ip = "20.1.1.185"
juiceshop_public_ip = "34.253.206.152"
Validate
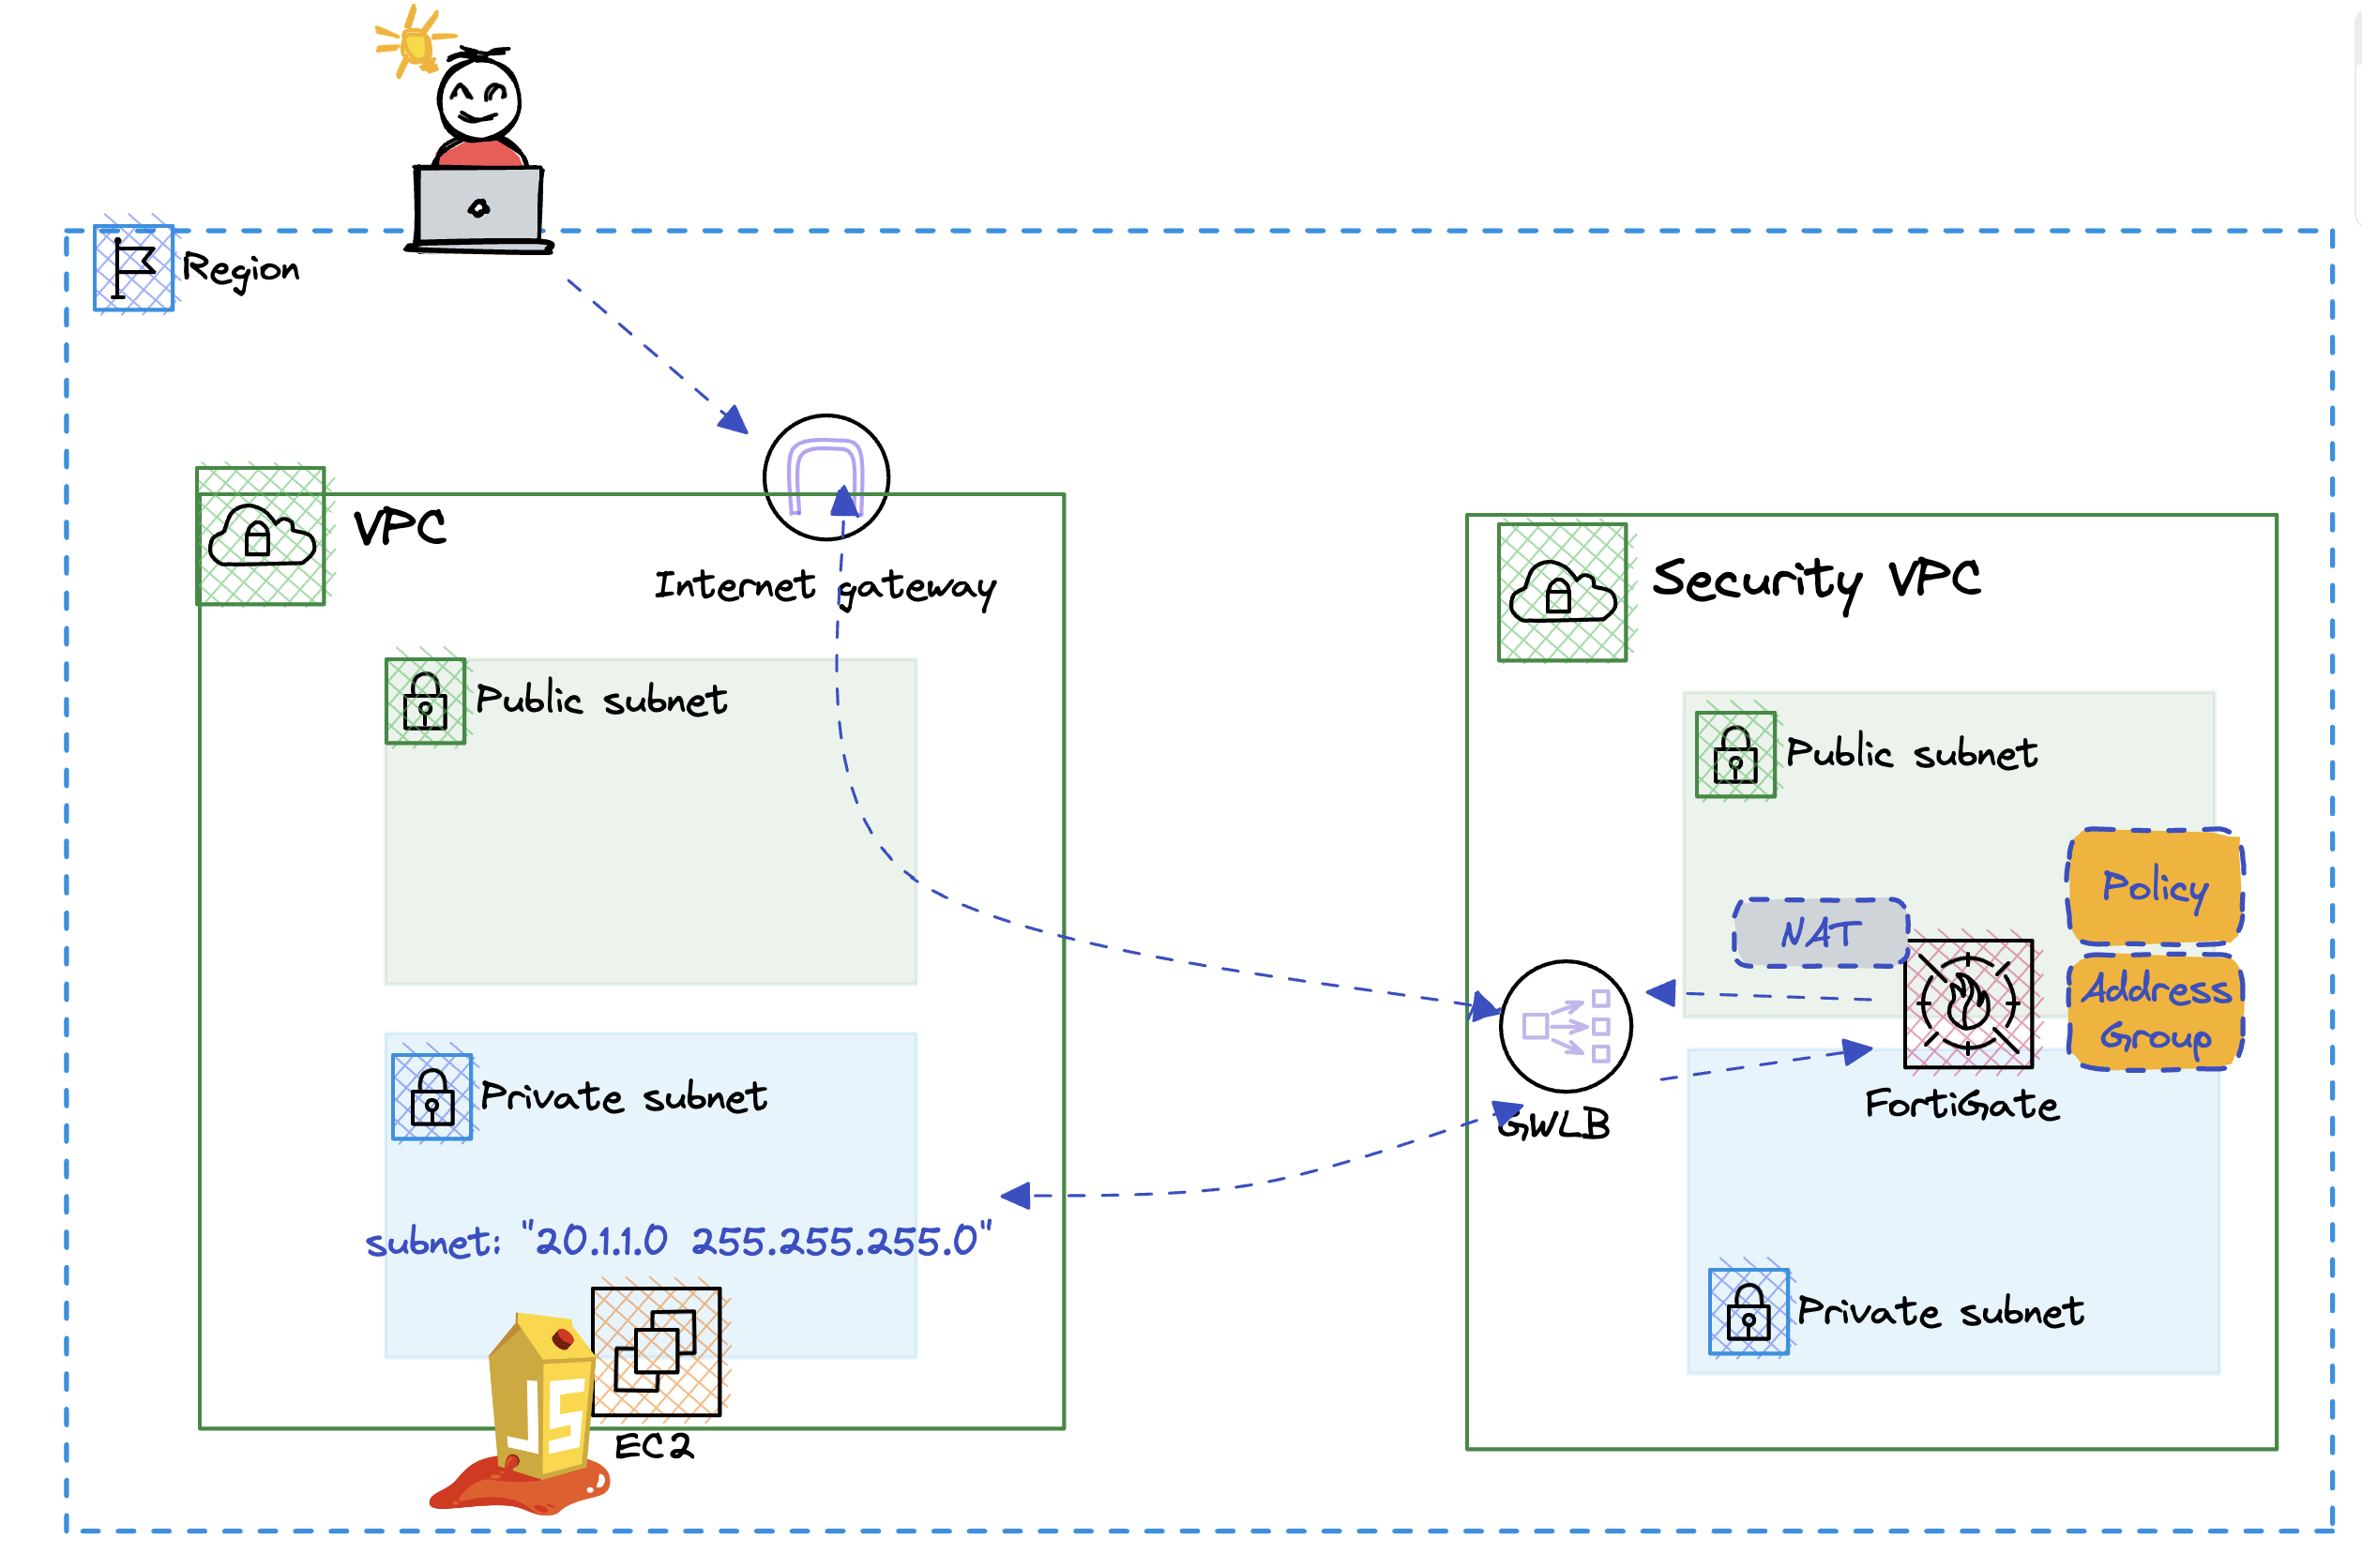
You can log into the foritgate and validate access to the web app on the juiceshop_public_ip public ip address. Access will be denied becuase we do not have a policy that allows external users to acces the service. So let’s move forward and create a playbook to allow access.
…
Allow Inbound Access
Create a playbook to allow access
With the application online, it’s time to allow access to the web application. To achieve this we need to the following.
- Create an address group with the application ip
- Create a policy to allow http access to the webserver
Create the playbook
Step 1. Create Next playbook
- Create a new file called 02-playbook.yml using vi or vscode and create the following playbook.
- Make edits to the playbook that include your private IP address
  - hosts: fortigates
  connection: httpapi
  collections:
  - fortinet.fortios
  vars:
   ansible_httpapi_use_ssl: yes
   ansible_httpapi_validate_certs: no
   ansible_httpapi_port: 443

  vars_files:
    - secrets.yml

  tasks:
      - name: Define a Juiceshop Web Address
        fortios_firewall_address:
          vdom: "{{ vdom }}"
          access_token: "{{ fortigate_token }}"
          state: "present"
          firewall_address:
            name: "web-add-group"
            subnet: "20.1.1.185 255.255.255.255"
            comment: "Created by Ansible"

      - name: Create Firewall Policy for JucieShop
        fortios_firewall_policy:
          vdom: "{{ vdom }}"
          access_token: "{{ fortigate_token }}"
          state: "present"
          firewall_policy:
            policyid: 2  # Adjust policy ID as needed
            name: "inbound_juiceshop"
            srcintf:
              - name: "awsgeneve"  # Specify the source interface
            dstintf:
              - name: "awsgeneve"  # Specify the destination interface
            srcaddr:
              - name: "all"
            dstaddr:
              - name: "web-add-group"
            service:
              - name: "HTTP"
            action: "accept"
            schedule: "always"
            logtraffic: "all"
Step 2. Execute the configuration
ansible-playbook -i hosts.ini 02-playbook.yml --ask-vault-pass
Step 3. Try to access the webapp
- Validate the deployment, try to hit the webapp using the public ip address.
- Log into the fortigate firewall and take a look at the firewall policy to see what was built and to see the traffic counter when you visit the webapp

…
Ansible Templates
Ansible Jinja2 Templates
Ansible utilizes Jinja2 templating to enable dynamic expressions and access to variables. Jinja2 is a modern and designer-friendly templating language for Python, modeled after Django’s templates. It’s widely used in configuration management and is a fundamental tool in Ansible for creating dynamic, flexible playbook and role configurations.
Key Features of Jinja2 in Ansible
- Variable Substitution: Easily substitute variables in your templates. For example,
{{ variable_name }}would be replaced with the value ofvariable_name. - Control Structures: Incorporate control structures like loops and conditionals. For example,
forloops can iterate over lists, andifstatements can conditionally include or exclude parts of the template. - Filters: Transform the output of expressions with filters. For instance, you can use the
defaultfilter to provide a default value if a variable is undefined. - Template Inheritance: Use template inheritance to build a base “skeleton” template that contains all the common elements and defines blocks that child templates can override.
Why Use Ansible Jinja2 Templating?
- Flexibility: Jinja2 templates allow the creation of flexible configurations that adapt to the context of deployment environments, different hosts, and other variable data.
- Code Reusability: Templates help in reusing code. Common configurations can be written once in a template and then reused, reducing errors and saving time.
- Simplicity: Jinja2 syntax is readable and easy to understand, making your Ansible playbooks and roles more maintainable.
- Dynamic Configuration Files: Generate dynamic configuration files for applications and services, which is especially handy in environments with multiple servers or varying parameters.
- Conditional Expressions: Easily manage complex configurations with conditional expressions, adapting the configuration based on the specific circumstances of the deployment.
Example Usage
  - name: Configure Apache
  template:
    src: /templates/httpd.conf.j2
    dest: /etc/httpd/conf/httpd.conf
Let’s build a template
Automation is here to make our lives easier. Therefore, if we wish to continue managing address groups and policies using Ansible, we should aim to build templates that can be reused, with our best practices integrated. Let’s templatize the deployment of a new address group.
- We are adding a new subnet and want to provide internet access to these hosts.
- We will built a ansible-playbook and jinja2 template to achieve this.
Create the fortigate_config.j2 template
Create new file called fortigate_config.j2 and paste the following.
  - name: Build address Group
  fortios_firewall_address:
    vdom: "{{ vdom }}"
    access_token: "{{ fortigate_token }}"
    state: "present"
    firewall_address:
      name: "{{ address_object_name }}"
      subnet: "{{ address_object_subnet }}"
      comment: "Created by Ansible"

- name: Create Firewall Policy
  fortios_firewall_policy:
    vdom: "{{ vdom }}"
    access_token: "{{ fortigate_token }}"
    state: "present"
    firewall_policy:
      policyid: "{{ policy_id }}"
      name: "{{ policy_name }}"
      srcintf:
        - name: "awsgeneve"
      dstintf:
        - name: "awsgeneve"
      srcaddr:
        - name: "all"
      dstaddr:
        - name: "{{ address_object_name }}"
      service:
        - name: "{{ service_name }}"
      action: "{{ action }}"
      schedule: "{{ schedule }}"
      logtraffic: "{{ log_traffic }}"
Step 2. Create the playbook
- Create a new playbook called 03-playbook.yml with the following variables
  - hosts: fortigates
  connection: httpapi
  collections:
  - fortinet.fortios

  vars_files:
    - secrets.yml

  vars:
    ansible_httpapi_use_ssl: yes
    ansible_httpapi_validate_certs: no
    ansible_httpapi_port: 443
    address_object_name: "az2_subnet"
    address_object_subnet: "20.1.3.0 255.255.255.0"
    policy_id: "4"
    policy_name: "inbound_az2"
    service_name: "ALL"
    action: "accept"
    schedule: "always"
    log_traffic: "all"

  tasks:
    - name: Apply FortiGate Configuration
      include_tasks: fortigate_config.j2
Step 3. Execute the configuration
ansible-playbook -i hosts.ini 03-playbook.yml --ask-vault-pass
Step 4. Validate the deployment
- log into the firewall and find the address groups and policies deployed.
…
Clean up
Clean up
Let’s clean up the environment. Execute the following code
  chmod +x cleanup.sh
./cleanup.sh
…